Your Step-by-Step Guide to Professional Roof Underlayment installation
Proper roof underlayment installation is critical when protecting your Edgewater home from Maryland’s unpredictable weather. At Thunder Bay Roofing, we’ve perfected our roof underlayment installation process through years of experience working on homes throughout Edgewater, Annapolis, Arnold, MD, and surrounding communities. Our meticulous approach to the roof underlayment process ensures your roof underlayment provides maximum protection for decades to come.
Understanding exactly how your roof underlayment gets installed helps you make informed decisions and know what to expect during your roofing project. Co-owners Nick Perz and Steven Friedman have developed a comprehensive installation process that meets all Maryland building codes while exceeding industry standards for quality and durability. Learn more about the roof underlayment process in Edgewater, MD, by calling us at 410-956-7663 or by reading the helpful guide below.
Why Edgewater Homeowners Trust Thunder Bay Roofing

As your local roofing specialists, we know your home is more than just a building—it’s where you gather after days at Sandy Point State Park, unwind after exploring Annapolis, and watch sunsets over the South River. That’s why we handle every roof underlayment installation with the care your home deserves. Co-owners Nick Perz and Steven Friedman built Thunder Bay Roofing on quality workmanship and strong local relationships, not quick profits.
We’ve protected homes across Anne Arundel County for years, from Chesapeake Bay waterfronts to neighborhoods near Mayo Beach Park. Our crews understand how local weather and historic architecture affect roofs, and we know every Edgewater home needs protection from summer storms to winter weather. When you choose Thunder Bay Roofing, you’re partnering with neighbors invested in keeping our community’s homes safe, dry, and beautiful for years to come. Call us at 410-956-7663 to set up your roofing underlayment consultation.
Why Professional installation Makes All the Difference
Experience Matters in Maryland’s Climate
Installing roof underlayment isn’t just about rolling out the right underlayment material and nailing it down. Thunder Bay’s humid summers, variable winters, and proximity to the Chesapeake Bay create unique challenges that require specialized knowledge and techniques. Our team understands how different roofing materials behave in our local climate and adjusts installation methods accordingly.
Code Compliance and Permit Requirements
Anne Arundel County has specific requirements for roofing underlayment installation, especially for homes near water bodies like the South River. We handle all permit applications and ensure every installation meets or exceeds local building codes for both new construction and renovation . You’ll never have to worry about roofing system compliance issues when you choose Thunder Bay Roofing.
Customer Preparation Checklist
To ensure a smooth and efficient installation process and adhere to our safety protocols , we recommend that homeowners take a few preparatory steps before work begins:
- Move vehicles away from the driveway and garage to allow clear access for materials and equipment.
- Secure pets indoors and inform all household members about the upcoming work.
- Remove or cover valuable items in the attic, as some dust or debris may fall during installation.
- Trim back overhanging tree branches near the roof.
- Notify neighbors about the project to minimize inconvenience.
- Provide access to outdoor power outlets if possible.
Our 8-Step installation Process
Step 1: Initial Inspection and Preparation
Before any installation begins, we conduct a thorough inspection of your existing roof structure. We check the roof for damage, measure slopes and angles, and identify any problem areas that need special attention. This includes examining areas around chimneys, skylights, and valleys where water intrusion is most likely.
Step 2: Weather Assessment and Safety Setup
Maryland weather can change quickly, so we monitor conditions closely before starting installation. We never install underlayment during precipitation, when winds exceed 25 mph, or when temperatures fall outside the manufacturer’s specifications.
Step 3: Old Material Removal (If Needed)
For replacement projects, we carefully remove existing shingles and old underlayment. This step reveals the true condition of your entire roof deck and allows us to address any underlying issues before installing new materials. We protect your property with tarps and magnetic nail sweepers to keep debris contained.
Step 4: Roof Deck Inspection and Repair
With the old materials removed, we thoroughly inspect the roof decking for damage, soft spots, or areas that need reinforcement. Any damaged or rotted sections are replaced with new plywood or OSB sheathing that matches the existing deck thickness, and cap nails are added where necessary. We also check fastener patterns and add additional fasteners if needed to ensure the deck meets current wind load requirements for our area.
Step 5: Drip Edge and Ice Dam Protection
Before installing the main underlayment, we install a drip edge along the eaves and rakes. In areas prone to ice dams, we apply self-adhering membrane along the eaves, extending at least 24 inches past the interior wall line. This step is especially important for homes in northern Anne Arundel County or properties with complex rooflines where ice damming is more likely to occur.
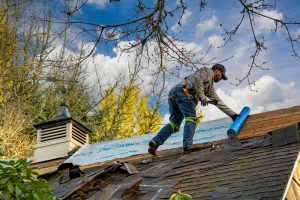
Step 6: Primary Underlayment Installation
We begin installing the primary underlayment at the eaves, working our way up the roof. Each row overlaps the previous row by at least 2 inches horizontally, with vertical overlaps of 6 inches minimum.
Fasteners are placed according to manufacturer specifications—typically every 6-8 inches along edges and every 12 inches in field areas. We use the appropriate fastener type and durable underlayment material for your roof deck.
Step 7: Valley and Penetration Details
Valleys, chimneys, skylights, and other roof penetrations require special attention. We install additional layers of protection in these critical areas, often using premium materials like self-adhering membranes, even when standard underlayment is used elsewhere.
All penetrations are properly sealed and integrated with the underlayment system to ensure it is installed correctly and creates a continuous moisture barrier.
Step 8: Final Inspection and Quality Control
Before installing shingles, we conduct a comprehensive inspection of the entire underlayment installation. We check all overlaps, fastener patterns, and detail work to ensure everything meets our quality standards and manufacturer requirements.
Special Considerations for Flat or Low-Slope Roofs
As your contractor, we take extra precautions when working on flat or low-slope roofs due to their higher risk of water infiltration. Here’s how we address these challenges:
- Specialized Underlayment: We use self-adhered or high-performance waterproof membranes designed specifically for low-slope applications to ensure maximum protection.
- Meticulous Seam Sealing: All seams and overlaps are carefully sealed to prevent leaks, with extra attention to areas around penetrations and edges.
- Drainage Solutions: We evaluate and, if needed, improve drainage by recommending tapered insulation, scuppers, or internal drains to prevent standing water.
- Ventilation: We assess ventilation needs and may suggest alternative solutions to help manage moisture and prevent condensation under the roof deck.
- Material Selection: We only use underlayments rated for low-slope roofs and compatible with your chosen roofing material.
Materials Our Roofers Near Annapolis Work With
Asphalt Felt Underlayment
Traditional 15-pound and 30-pound felt remains popular for budget-conscious projects. We use high-quality felt products and follow strict installation procedures to maximize their performance and lifespan in Maryland’s climate.
Synthetic Underlayment
Our preferred choice for most Maryland homes, synthetic underlayment offers superior durability, weather resistance, and installation safety. We work with leading manufacturers to provide products designed for our regional climate conditions.
Self-Adhering Membranes
For premium protection, especially in vulnerable areas like valleys and eaves, we install durable rubberized asphalt membranes that create a completely waterproof seal. These products are essential for homes near the Chesapeake Bay or in areas with severe weather exposure.
Quality Control Throughout installation
Real-Time Weather Monitoring
We continuously monitor weather conditions during installation and make real-time decisions about when to pause work or implement additional protection measures. Your home’s safety always comes first.
Material Handling Best Practices
Different underlayment materials require specific handling techniques. We store materials properly, handle them carefully during installation, and follow manufacturer guidelines for temperature ranges and installation conditions.
Documentation and Warranty Compliance
Every installation is thoroughly documented with photos and detailed records. This documentation ensures warranty compliance and provides valuable reference information for future maintenance or repairs.
What to Expect During installation
- Noise and Activity Levels: Roof underlayment installation involves moderate noise levels, typically between 7 AM and 6 PM on weekdays.
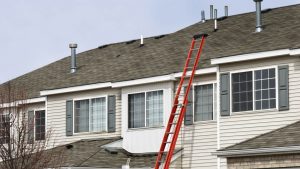
- Access and Parking Needs: Our crew needs access to your roof perimeter for material delivery and equipment setup. We’ll discuss parking arrangements and any access limitations during our initial site visit.
- Weather Contingency Planning: If weather conditions change during installation, we have procedures in place to quickly protect your home with temporary coverings while we wait for conditions to improve.
installation Timeline Expectations
- Standard Projects: Most underlayment installations on homes up to 2,500 square feet take 1-3 days, depending on roof complexity and material type. Simple gable roofs with synthetic underlayment typically complete fastest.
- Complex Roofs: Homes with multiple dormers, steep pitches, or intricate designs may require 3-5 days for complete installation. We provide realistic timeline estimates during your initial consultation.
- Weather Delays: Maryland’s weather can be unpredictable, especially in spring and fall. We build potential weather delays into our project scheduling and keep you informed of any timeline changes.
Post-installation Care and Next Steps
- Immediate Protection: Once underlayment installation is complete, your home has significantly improved weather protection. However, shingle installation should follow as quickly as possible to provide complete roof system protection.
- Temporary Weather Events: If weather delays shingle installation, your new underlayment provides excellent temporary protection. We may apply additional temporary fastenings or coverings if severe weather is forecast.
- Warranty Activation: Your underlayment warranty becomes active upon completion of installation. We provide all necessary documentation and register your warranty with the manufacturer when applicable.